Sunday, April 1, 2012

A New Workspace {Or A New Desk}

Most of you know me pretty well, so you know that my Etsy shop is pretty important to me. It was a whim of a hobby that I quickly decided to turn into a business. For a long time it didn't make any money at all. But all of a sudden, my little hobby turned into, what I would call, a part-time business. Heck, I even started to turn a profit! I only make a couple of hundred dollars per month but that's enough to warrant me having a pretty cool workspace (even if it's in my unfinished basement)!

So, let the makeover begin!

Here is a before shot of my desk:

My desk was actually a vanity that I bought in San Diego and it was tiny. It was always messy (because I like to create more than clean) and I could never find anything. On the plus side, there were a lot of drawers but they were pretty shallow.

When we moved to Colorado my business took off (probably because I had left my friends behind in SD) so Matt and I started a hunt for a new desk - looking only at garage sales since we knew that my business couldn't support buying brand new furniture. One day we found this desk:

An old wooden desk that pretty much resembles a desk that Matt had as a teenager. It was quite beat up but $20 for a very solid wooden desk was a great deal!

So, my boys got to work...

(This was taken this past November - Ethan looks so much smaller!)

...and created this:

Isn't it pretty and huge?! Matt sanded down the legs since they were uneven and he painted the whole thing white.

But wait! It actually has a feature! Let me show you...

Ta-da! The side door opens and holds a hidden shelf that's on a hinge so you can pull it up to work. I have one of my die cut machines on it.


When I'm done, I can hide it away! No muss no fuss! Pretty cool right?!


This is only the first of two desks that Matt is making me. The second one is half way done and I'm very excited to show you my whole studio space when it's complete.

Oh, and for of those of you who think my new desk looks messy - it's not! This is super clean!!

The 1850 Mile Pinterest Challenge of 2012 - March

Better late than never on this post...

For March, I decided to do an easy project and something seasonal. Thus, St. Patrick's Day + freezer paper and paint = Homemade stenciled shirts!

For those people who don't know about freezer paper, it can be found in the grocery store where the saran wrap and tin foil is. I guess you're supposed to use it to wrap up things like meat before it hits the freezer but what's neat about it is that it's waxy on one side and papery on the other...


...perfect for arts and crafts (which makes me smile)!:


To start, I pulled out some freezer paper and used (with consent) a stencil that I found on thisblog . Whatever you do, make sure you either draw your own image or take from someone who is giving. Do not steal images - not okay.

Anyway, using a sharpie I traced my printed image (on the papery side, of course!)

This was my image:


Then you grab your exacto knife and start carefully cutting out along the inner lines. This was hard for me. I'm not very good with an exacto knife and I found it a bit tedious but with a little time and patience it worked!


Here's what it looked like when I was done with all the cutting:


Then you have to choose something to stencil. The craft store offers many options from shoes and hats to t-shirts to baby onesies. I choose the classic white tee.


After ironing the shirt, I took my stencil and ironed it on. This is the fabulous thing about freezer paper - paper on one side for drawing and wax on the other side to stick to fabric when heat is applied.


Move your shirt to a counter or table and grab a piece of cardboard to put inside the shirt. You don't want your fabric paint to leak through to the backside of your shirt.


Now for the fun part, grab your fabric paint and a sponge and start dabbing the paint onto your shirt and stencil. Covering the areas isn't easy and I couldn't get mine perfectly uniform but try your best.


In many cases, I would just squirt the paint right onto the shirt and dab it in.


When you're done, it should look something like this:


Then the big reveal! While the paint is still wet, start peeling the stencil off your shirt. It should come off very easily and leave no residue behind.


You should be left with a cute and funky shirt!


To make a second shirt (two boys=two shirts), I ironed on the shamrock stencil that I had cut out from making the first shirt.


I applied a thin strip of fabric paint onto the stencil and then I took my sponge and smeared the paint onto the shirt.


When I was done, it looked like this:


For the new frugal us of 2012, this project was eye opening! Cute, simple, almost one-of-a-kind t-shirts for less than $2 a piece?! I'll take it!

Sunday, February 12, 2012

The 1850 Mile Pinterest Challenge of 2012 - February

It's that time of the month...it's Pinterest Challenge time!

As you know my sister and I (and my friend Amy) are doing a 1850 Mile Pinterest Challenge. Each month we post about something that we have found on Pinterest and we make it ourselves.

Since it's February, I have decided to go ahead and do a Valentine idea. This was the original picture:


It's actually an idea that comes from the Etsy shop twistedtwig.

So, off I went to the craft store to buy paper mache letters (measuring about 12x12") and sequins. Loads of sequins. I decided to do my letters in a soft pink and red for the holiday.


Then I sat. For hours. Gluing on each sequin to each letter. I have no idea how long this took (days and days) and I glued over 1600 individual sequins (800 in each bag and I used 2 full bags and then some!)


It was tedious and a bit boring but it yielded great results.

TA-DA!


The word 'LOVE' all in pretty sequins. The heart garland is my own creation and can be found here. (Okay, a little plug for me too!)

Here's the close-up:


And the closer-up:


And the closest I could get:

I LOVE it! It brightens up the mantle and is so very cute! Matt hasn't seen it completed yet but even when we had bare letters up, he could understand why letters seem to be the new trend.

Has anyone else completed their Pinterest project for the month? Please share!

Thursday, January 12, 2012

The 1850 Mile Pinterest Challenge of 2012

A few months back, my sister Tamara and I were reading Young House Love (a blog devoted to doing home renovations on the cheap) when they were doing a Pinterest challenge. They invited others to participate and it sounded like fun. Life got complicated though and we never participated. So, we made a new due date (which I missed twice by the way) and we decided to share what we made based on an image we saw on Pinterest. We are calling it The 1850 Mile Pinterest Challenge since that is how far apart we live. We will be doing a new project every month so get ready for some serious crafty business!

As an aside...

Does everyone know what Pinterest is? Pinterest is when you 'pin' photos onto virtual boards of items that are of interest to you {Pin + Interest = Pinterest} If you've never gone to their site, well, be careful, it can be very addictive and fun. You can check out my Pinterest boards here, if you'd like.

Now onto my project...

I have a lot of old silver ware. All of it has some sort of significance - old baby spoons, forks, etc. and for years it has sat collecting dust. These are items that you don't want to throw away but what do you do with them...

Well, off to IKEA I went (loving the new IKEA) and bought some shadow boxes - 4 for $40.


I also went and bought 4 pieces of scrap paper for 0.59 each.


After I got home, I got out the silver and asked my mom who was visiting at the time to clean all the silver. Good to have Mom around!


Then I got my Mom to wash the glass on the frames.


While Mom was busy doing her parts, I set to work taping the scrapbook paper into the frame backs using small loops of tape.


All these tasks took about 20 minutes. I then hot glued my silver to the scrapbook paper. But, when I put the frames back together, the silver was too heavy and the glue didn't hold. So, Matt got out his drill and drilled some tiny holes for me straight through the paper and backing. I got out my needle and baker's twine and secured the silver ware using that instead. It worked like a charm!

And now for the big reveal...

I (we, since I had a ton of help) made four because their are four people in this family all with baby silverware to share. Matt wrote our names on the backs and our birth years in case they are ever passed down the family line.

We decided to hang our new art in the dining room above the window.


Here are some close ups.


More art for the dining room and this time it was less than $50! Pretty good I think!

(If you liked this post and want to join our challenge, let us know! The more the merrier!)

Thursday, January 5, 2012

New Stamps

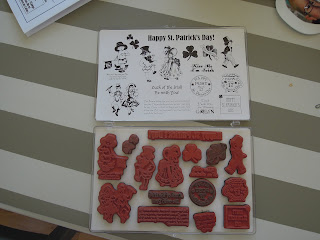
I want to tell you about some new stamps I found on Etsy. They are amazing! They are made by TweetyJill and they are so sweet.

I wanted to make some vintage inspired Valentine and St. Patrick's Day garlands but I had no stamps that fit the bill. So, off to shop I went. I found these amazing collections on Amazon and decided that I had to go look on Etsy to see if maybe, just maybe, someone was selling them used.

What luck! Someone was selling them used. Carol from yesteryearnotions. She is selling many of her craft supplies due to horrible life circumstances that I won't go into here. Carol is so sweet and nice and she shipped my stamps lickety split! I received them right after the holidays in perfect condition and they are as amazing in person as they are in the pictures. I have been having so much fun stamping my days away.

Here are the stamp sets that I bought:


And here are some of the items, I have made for the shop using my amazing stamps:

St. Patrick's Day stickers

So, if you're in the market for new stamps, check out TweetyJill and pop in to say hi to Carol. You won't be disappointed!

Monday, January 2, 2012

Valentine Day Garlands

Well, I didn't win the contest but I renewed my old blog and for now that's good enough for me!

Moving on...

I have been so busy with Valentine Day garlands! They have been selling well and it's still early January which is fabulous! Here are my two heart garlands that I hope sell out at lightening speed:


{see description here}


{see description here}

These garlands are super inexpensive and super cute! They look amazing draped across pretty much everything!

And, of course, let's not forget an old favorite which is also the most popular item in my store:

I also decided that we all need a little luck at the beginning of the new year, so I made this pretty garland:


So cute! Maybe, just maybe I might have to have a giveaway for these lovelies. Any thoughts?!